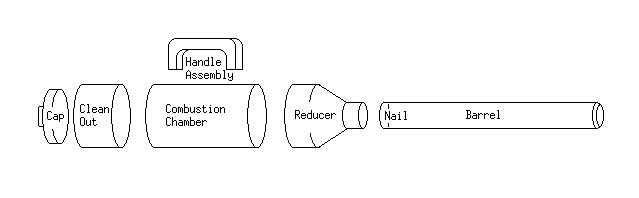
These instructions explain how to build and use a "Spud Gun", or potato gun. The cost of materials is roughly $25, and it should take only a few evenings or a weekend day to build the gun from these parts. You will need an assortment of tools, including a drill, screwdriver, crescent wrench, and wiring tool. A Dremel rotary tool is very useful too. Here is a drawing of the basic design and construction of the gun:
| Description | Material | Quantity | Cost | Comments |
|---|---|---|---|---|
| Combustion chamber | 4" Schd 40 PVC | 12" length | $1.50 | Sold in 10’ lengths! |
| Barrel | 2" Schd 40 PVC | 36" length | $1.00 | Sold in 10’ lengths! |
| Clean out | 4" Schd 40 PVC | 1 | $4.00 | Female, fits outside 4" pipe |
| Clean out Cap | Schd 40 PVC | 1 | $1.50 | Fits clean out fitting |
| Reducer fitting | 4" to 2" Schd 40 PVC | 1 | $4.00 | |
| BBQ Grill ignitor | Piezo-electric | 1 | $8.50 | Available at Sears, wire lead included. |
| Handle | Wood or plastic | 1 | $2.00 | About 8" length, carved and drilled to accept ignitor |
| Lag screws | ¼" x 1¼" | 2 | $.30 | Handle assembly |
| Fender washers | ¼" x 1" | 2 | $.20 | " |
| Stove bolts | ¼" x 1 ½" | 2 | $.75 | Electrode assembly |
| Nuts | ¼" | 4 | $.40 | " |
| Washers | ¼" | 8 | $.40 | " |
| Spade Connectors | #14 electrical fitting | 2 | $.20 | Crimping tool recommended |
| Electrodes | #12 solid bare copper wire, about 4" length | 2 | $.35 | Sharpen tip |
| Ground wire | #14 insulated wire, 8" length | 1 | $.25 | Connects ignitor ground to electrode. |
| Stop bar | Nail | 1 | $.10 | At base of barrel |
| Plunge Rod | Broom stick | 1 | $1.00 | ½" PVC pipe with caps works too |
Other Supplies:
PVC Cement, clear, small can
Acetone & Rags, to clean PVC
Electrical Tape
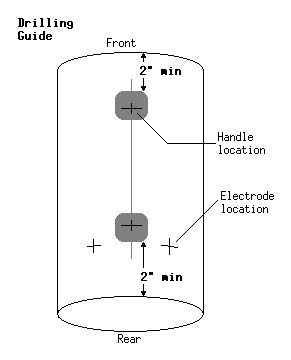
If you buy a pre-cut handle such as is used on a tile grout tool or sanding pad, all you will need to do is drill the holes for the ignitor and the wires. I cut the handle from 2x4 stock on a band saw, routed the edges, then drilled the holes. I also sanded the base of the handle to a concave shape to more closely match the contour of the 4" PVC hull of the combustion chamber. To drill guide holes for the lag bolts, mark them while in position on the hull (see next paragraph) - these should be drilled with a 3/16" bit. I usually leave the red-dye writing on the PVC to help line up (as if a centerline) the holes for the handle and electrodes. Test the ignitor, and test fit the ignitor in the handle.
Now mark the holes on the hull for the handle and the electrodes. Refer to the diagram (right) for the approximate location of the holes. All holes will be drilled using a ¼" drill. The handle mounts should not be any closer than 2" from the edge; of the pipe, to allow room for the reducer and clean out fittings. Locate the holes for the electrodes about 3 inches from the back of the pipe, and about 1 ½" off to the side of the rear handle mount.
Clean the hull using Acetone and rags. Attach the handle to the hull of the combustion chamber using the 2 lag bolts and the 2 fender washers. Be sure the ignitor end faces the barrel end of the gun. Tighten the bolts until the washers are secure against the inner wall of the hull.
 Next, locate the ground contact for the ignitor. Strip insulation off of one end of the #14 wire, and attach it to the ground point using electrical tape. Being generous with the tape, wrap the ground wire to the ignitor. Attach the positive lead wire to he tip of the electrode (usually supplied with the ignitor), or use #14. Feed the 2 attached wires through the handle from the ignitor end, then insert the ignitor into its hole.
Trim the electrode ends of the 2 wires and crimp on the spade connectors. Assemble the 2 electrodes according to the following diagram. Be sure and create a loop in the #12 copper wire so it fits tightly around the stove bolt. Attach the ignitor wires to the electrodes, positive on one side and ground on the other. Tighten the nuts as you assemble.
When the electrodes are firmly installed, bend the copper wires so that they point towards each other, and so the gap between them is about 3/8". Test the ignitor, and adjust the gap if necessary. If no spark appears, you probably have a short someplace, and you will need to locate where the spark is happening, and add more insulation at that point.
At the combustion chamber end of the barrel, you must locate a stop bar, which prevents the potato from falling into the chamber. This is made from a nail, which should be inserted through holes drilled in opposite sides of the barrel, and close enough to the end that the holes will be covered when the barrel is glued into the reducer - about ½" or so from the edge. Drill the holes, insert the nail, and cut the ends of the nail flush with the outside of the barrel.
At the opposite end, taper the outside edges of the barrel so as to provide a cutting edge. This will act as a "knife" that trims the potato to the proper size during loading.
Clean all of the PVC using the Acetone and rags. Pay particular attention to the contact surfaces of the fittings. Refer to the diagram to understand how the parts fit together.
***NOTE - the CAP of the Clean Out fitting is not cemented! This is where the propellant is added, so the cap must be able to unscrew!!!
Work one fitting at a time. Test the fit. Using the cap brush in the can of PVC cement, apply some cement to both surfaces to be joined, and quickly press the fittings together. The cement sets right away, so be sure that the fittings are completely seated immediately upon assembly. The cement cures completely in a matter of hours. Read the can for details.
When attaching the barrel, make sure that the stop bar (nail) is in place as you slide the barrel into the reducer.
Safety first! NEVER, EVER point the gun at any person or animal, nor at houses or cars. A good place to fire the gun is into a lake or pond, or off into a field. Use care when around other people’s property, because a falling potato can damage things! Don’t load hard or sharp objects into the gun. Stick with sensible uses and nobody gets hurt.
You will need ammunition and propellant. For ammo, potatoes are most common (10 lb. bag), but in a neighborhood environment you can use plastic grocery bags. For propellant, White Rain hair spray is best, and cheap. You should be able to fire the gun about 20 - 30 times on one can. Some people use WD-40, but it’s expensive. You can get some suggestions for propellants from web sites.
First, verify that a good spark is being produced. Clean or adjust the electrode points if necessary. With the gun barrel up, press a potato into the barrel, and slide it down using a plunge rod (a broom stick or dowel rod). Next, remove the Clean Out cap. Holding the gun barrel down, spray in the hair spray for 2 to 5 seconds. Quickly replace the cap, and screw it in until it’s secure (doesn’t have to be tight, just in!). Aim the gun up and away, and click the ignitor. POW! Off she goes! Watch and listen. This is what spud gunning is all about.
If nothing happened, you may click a few more times, but don’t go staring down the barrel. It’s probably the spark, but sometimes it’s the propellant. If your potato didn’t fit so well, the gas sometimes escapes around it. You might need to re-load. If you’re going to check the spark, make sure the chamber has aired out some before you stick your face in there and click the ignitor - big flash if there’s still gas in there and the ignitor works!!! Again, safety first! Don’t try stupid things.
Firing the gun at night, you’ll see the gun light up yellow-orange, and a blue flame comes out the barrel. Cool!
As for the likelihood the gun will explode and hurt you... the PVC can withstand pressures of 200 psi, while the hair spray generates forces of around 25-40 psi. So, there’s a margin of safety.
Since the gun is made of plumbing materials, it’s completely safe to wash it out with soap and warm water. The hair spray is so sticky, that if you don’t clean the gun when you’re done, the Cap probably won’t open the next time you go to use it. I usually clean the cap threads with a sponge and dish soap, then I close the cap and stick the barrel up under a faucet till there’s a quart of warm soapy water inside. Then I put my hand over the barrel and shake the gun a few times. Then I pour out the water through the barrel, and rinse it a few times the same way. Should give years of service. I’m told that the ignitor can sometimes fail. If so, they cost only $8.50 or so. All the other parts are cheap and replaceable.
Potato Guns Threaten Life and Limb -- And They're Really Cool
By Dave Barry
Copied from Colorado Springs Gazette Telegraph
Sunday, September 11, 1994
(NOTE FROM THE LEGAL DEPARTMENT: The activities described in this column are dangerous and stupid and possibly illegal and should be performed only by trained humor professionals who are good at sneaking around. This newspaper assumes no responsibility or liability for any injuries, deaths, maimings, cripplings, eyes getting poked out, pregnancies, fires, riots, ointments or suppositories that may or may not occur as a result of some moron attempting any of these activities or any other actions, forfeitures, debentures, indemnifications, and such other big scary legal words as we may or may not think up at some future point in time. Thank you.)
For more than a year now, alert readers have been sending me alarming newspaper articles about the "potato gun," a bazooka-sized device that can shoot a potato several hundred yards at speeds up to 1,000 feet per second. To give you an idea how fast that is, an ordinary potato, on its own, will rarely travel more than four feet per day, even during the height of mating season.
Potato guns -- which have already been banned in some municipalities -- can be easily made from plastic pipe available in any plumbing supply store; the explosive force comes from ordinary hair spray, which is ignited by an electrical spark. Needless to say I will not provide any specific details concerning how to construct these devices, because a great many young people read this column, and they already know how to construct these devices.
Anyway, I recently got a fax from an individual whom I will identify here only as "Buzz Fleischman, 810 Pinecrest Drive, Miami Springs, Fla. 33166, telephone (305) 885-4817." Buzz, who makes his living performing humor at corporate meetings and other functions, and who by the way currently has some openings on his calendar, informed me that he had constructed a potato gun, and was willing to demonstrate it for the purpose of helping me, as a responsible adult, better understand just how alarming this menace is.
We decided to fire the potato gun from the roof of my place of employment, The Miami Herald (motto: "We Are Still Keeping An Eye On Gary Hart"). Let me stress that The Miami Herald is a responsible institution that does NOT ordinarily allow people to shoot potatoes from its premises. We were able to do it only because we met the very strict requirement of not asking for permission. It was a Covert Operation, during which we addressed each other by code names except when we forgot. (For ease of memorization, we both used the code name "Eagle One.")
Once we got up on the Herald roof, we decided to fire the potato gun toward Biscayne Bay. Our other option was to fire it toward the city of Miami, which would have been a serious mistake because hundreds of local residents would undoubtedly have fired back (and not with potatoes, either).
To load the gun, Buzz stuffed a potato into the barrel and shoved it down with a pole, then sprayed some Aqua Net Super Hold hair spray into the detonation chamber. He then aimed the gun at the bay and pressed the ignition device, and FWOOOM, the potato came blasting out of the gun and went way way WAAAAY out over the water and landed approximately in Portugal.
As responsible adults, Buzz and I were very alarmed by this demonstration. We shot off a bunch more potatoes to see if we would continue to be alarmed, and we were. We also got excellent results with an onion.
But as any reputable scientist will tell you, the "acid test" of the alarmingness of this type of device is what happens when you shoot a Barbie doll out of it. We used the "Gymnast Barbie" model, which comes with a little gold medal. First we loaded a potato into the gun, then we put Gymnast Barbie into the end of the barrel, with just her head and hairstyle sticking out. Then we pointed the potato gun straight up and FWOOOM up went Barbie, high in the sky, smiling perkily, waving her arms and legs gymnastically around inside a cloud of potato atoms before finally landing in a really unladylike pose.
Needless to say these results were extremely alarming. Because if the potato gun can be used to shoot Barbie dolls, then it is only a matter of time before some fiendish criminal mind thinks of using one to shoot a Kellogg's strawberry Pop-Tart. So we tried that, too. It was pretty disappointing. The gun made a noise like "phoo" and spat Pop-Tart fragments a short, nonalarming distance.
Nevertheless as concerned adults we all need to become wrought up about this menace. People should form organizations and write angry letters. Congress should hold hearings. The Clinton administration should announce a definite policy and then change it. Maybe the Warren Commission should get back together. Also the Defense Department should probably go on Red Alert, because any day now Portugal is going to start shooting back.